When asking for assistance with a PowerPoint problem, it’s helpful to know what version of Microsoft PowerPoint you are using. In this post I will show you how to easily tell the versions apart and find the exact version numbers. Please note that only PowerPoint for Windows is covered.

PowerPoint 2003 is the last version to use a traditional menu bar and toolbar (instead of a ribbon). Follow the steps below to find your copy’s version number:

PowerPoint 2007 introduces the Ribbon, a panel at the top of the window that organizes commands into tabs. You can tell PowerPoint 2007 apart from newer versions by the Office Button—a round button with the Office logo at the top left corner of the Ribbon. To to find the exact version number in PowerPoint 2007, follow these steps:

In PowerPoint 2010, Microsoft replaced the round Office Button with the File tab. You can find the version number as follows:

Compared to PowerPoint 2010, PowerPoint 2013’s user interface is much flatter, matching the design of Windows 8. To look up the exact version number, follow these steps:

PowerPoint 2016 looks quite similar to PowerPoint 2013, but Ribbon tab names no longer display in all caps. The steps to find the version number are exactly the same as in PowerPoint 2013:
PowerPoint (April 1987): 1.0
PowerPoint (May 1988): 2.0
PowerPoint 3 (May 1992): 3.0
PowerPoint 4 (February 1994): 4.0
PowerPoint 95 (July 1995): 7.0
PowerPoint 97 (January 1997): 8.0
PowerPoint 2000 (June 1999): 9.0
PowerPoint XP (May 2001): 10.0
PowerPoint 2003 (October 2003): 11.0
PowerPoint 2007 (January 2007): 12.0
PowerPoint 2010 (June 2010): 14.0
PowerPoint 2013 (January 2013): 15.0
PowerPoint 2016 (September 2015): 16.0
Keyboard shortcuts are a great way to improve your productivity with PowerPoint. Why? Because usually, you already have your hands on the keyboard. There is no need to disrupt your workflow by reaching for the mouse and moving the mouse cursor across the screen.
In this post, I will introduce you to twenty very useful keyboard shortcuts for PowerPoint 2013/2016. Please note that I don’t include common Windows shortcuts such as Ctrl+C (copy) and Ctrl+V (paste) in the list.
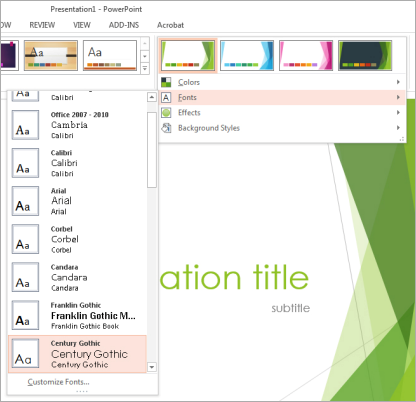
PowerPoint 2013 has a number of convenient features that allow you to change the fonts on a single slide or throughout your entire presentation. By changing the fonts, you can make your presentation more attractive and highlight parts that require more attention.


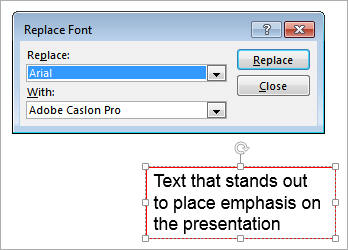
A word of caution: Once you have changed a font in your presentation, you should check whether the new font needs resizing. This is because not all fonts are equal in size (for example, size 24 in Arial font is very different from size 24 in Monotype Corsiva font).
If you are upgrading from PowerPoint 2010 to 2013, you might be wondering what new features have been introduced. This article gives you an overview of the most important changes.

One change is immediately noticeable upon opening PowerPoint 2013. The new Start screen provides easy access to both local and online presentation templates as well as recently used files.

A great addition to PowerPoint 2013 is its revamped theme system. For many years PowerPoint users have complained that the default templates are not customizable enough. PowerPoint 2013 is Microsoft’s answer to these complaints; variations on many of the built-in themes now allow you to quickly change the color palette, fonts, effects, and background styles of a presentation.

The Eyedropper is another handy tool introduced in PowerPoint 2013. A common tool found in many graphics programs, the Eyedropper allows you to copy colors from one object and transfer them to another. One of the main functions of the Eyedropper is picking up a color from a photograph and applying it to text or shapes on a slide so that the colors match.

Speaking of photographs, PowerPoint is now capable of embedding videos and pictures directly from the Internet. You can easily search for videos on YouTube or pictures on Bing and import them into your presentation.

Another incredibly useful new feature is Shape Merging, which allows you to combine existing shapes to create new ones. With the Merge Shapes tool, you can take two or more shapes and select whether you want to union, combine, fragment, intersect, or subtract them.

Whereas PowerPoint 2010 introduced smart guides—sometimes called “whiskers”—to help you align objects on the screen, PowerPoint 2013 enhances this system with guides that allow you to easily place objects equidistant from one another.

One of the biggest enhancements introduced in PowerPoint 2013 is cloud integration. Users now have the option to save their presentations directly to the cloud by using OneDrive (formerly known as SkyDrive). With OneDrive you are now able to simultaneously work with others on the same presentation, using either the desktop version of PowerMockup or the PowerPoint web app.

Another improvement that fosters collaboration with others is the new Comments Pane, which displays comments in a threaded view with avatars next to the commentators’ names. This makes writing and following comments much easier than in PowerPoint 2010.

Microsoft has also added a Touch Mode to make PowerPoint more accessible on tablets and other touch-screen devices. Enabling Touch Mode adds additional space between the icons on the Ribbon, making it easier to tap commands with your fingers.

Another handy new aspect of PowerPoint 2013 is the Welcome Back feature, which marks where you are working in a presentation when you close PowerPoint. Upon reopening PowerPoint 2013 you have the option to resume unfinished work exactly where you left off.

The Presenter View has also been enhanced. Now, you no longer have to worry about the creepy glow of a computer screen against your face while you give a presentation because Presenter View is much darker than previous versions. Extra controls are also available to help you more easily navigate through your presentation, and a timer is built into the preview. But the coolest feature of all is the ability to zoom in and out of a particular area of a slide or to jump to an entirely different slide by clicking on the thumbnail image.
Choosing the version of Microsoft Office that is right for your needs can be confusing. Here are some tips on ensuring that you’re getting the version that is tailored to your interests and budget.
Office 2013, the traditional release of Microsoft Office that runs on a desktop or a laptop Windows computer, comes in three versions:
There are two versions of the Cloud-based Office 365: Personal and Home. Office 365 Personal allows one person to access the site with a PC, Mac, iPad, or Windows tablet and use the Office programs online. Your Office 365 account includes online storage of the documents that you create.
Office 365 Home offers the same services to as many as five family members. The Personal version costs $6.99(US) per month, and the Home version costs $9.99. You can save about 16 percent on either Cloud-based version by signing up – and paying for – a full 12 months of service.
It’s easy to access your account using an iPhone, Android phone, or Windows phone. Word, Excel, PowerPoint, and Outlook are included for both Windows and Mac users. OneNote is also available to both groups of users, but Mac users need to download it from the Mac App Store. Publisher and Access are available only to PC users.
Office RT is the release of Office that is designed for use on Windows RT devices. There have been several versions of the software released since 2013, and the feature set seems to still be evolving. Before buying Office RT, visit Microsoft’s site and read about the feature-set and the licensing agreement that is currently in force.
Office Online is a free Internet-based service from Microsoft. Microsoft describes it as a way to “collaborate in real time on shared projects” and says that Office Online “works great with Office 365.”
The Office Online site itself is a doorway to eight individual sites on which you can create and share Office documents. The eight main menu items are Word Online, Outlook.com, People, OneNote Online, PowerPoint Online, Calendar, Excel Online, and OneDrive.
Office Online runs in any standard web browser, and there is no need to install software on your desktop or laptop computer. Visit office.com to get started.
First, decide if you want to continue to run the traditional type of Office that gets installed on the desktop or laptop computer that is located in your home or office, or if you want to move your Office processing to the Cloud. The desktop/laptop solution offers more control, more privacy, and a consistent processing speed. The Cloud solution can slow down when your Internet connection becomes sluggish, and stop completely when you lose your connection to the web. You can decide if your data is more safe and secure on your local computer or on a professionally maintained server at some undisclosed location somewhere on the planet.
Next, decide which applications you need. Word, Excel, and PowerPoint seem to be available on all flavors of Office. Most other Office programs are only available at premium prices.
It’s possible to use PowerPoint for years without ever thinking about the various file formats that are available to you. By learning about PowerPoint’s file formats and options, however, you can do a much more effective job of creating presentations, backing them up, sharing them with colleagues, and protecting the information that they contain.
When you save a simple PowerPoint presentation, you give it a name, and PowerPoint adds the file extension .pptx. Your Sales Presentation file becomes Sales Presentation.pptx.
If your PowerPoint presentation contains one or more macros, PowerPoint will automatically detect their presence and save your presentation as a .pptm file. You can force PowerPoint to save a presentation that includes macros as a .pptx file, but PowerPoint won’t let you play the macros that you’ve included in your slide slow. So it’s best to let it save your file with the .pptm extension.

If you need to share your presentation with a colleague who is using an older version of PowerPoint, then save your slides as a .ppt file. PowerPoint 97 through 2003 cannot open and process .pptx or .pptm files.
If you’re using PowerPoint 2007 or newer, you should always save your work in .pptx format (or in .pptm format if you’ve used macros in your presentation). The options described below are additional ways to save your work. Be sure to save them first as ordinary .pptx or .pptm files before you save them in any of these other formats.
If you want to give your PowerPoint presentation to a friend or colleague, and you don’t want them to change anything, then save your presentation as a PowerPoint Show file. Your colleagues can display your slides, but they will be unable to change any part of your presentation.
There are three types of PowerPoint Shows: Save an ordinary presentation as a .ppsx file. If you’re using macros in your presentation, save it as a .ppsm file. If you’re sending your slide show to somebody who is using PowerPoint 97 through 2003, then create a .pps PowerPoint Show file.
Be sure to save your presentation as a plain vanilla (.pptx) file or as a macro-enabled (.pptm) file. If you’ve only saved the Show file, you won’t be able to make changes to your presentation.
Picture Presentations add an additional layer of protection to your work. To the casual observer, a PowerPoint Picture Presentation looks like an ordinary PowerPoint slideshow. But when you save your work as a Picture Presentation, each slide is converted to a simple image.
Slides contain text objects, image objects, animations, transitions, and many other special effects. By contrast, Picture Presentations contain only snapshots of your slides.
If somebody wants to copy your work, they can see each of the images and retype the text. They can even grab (and re-crop) the images. But they cannot capture any of the magic that is PowerPoint.
If you create a Picture Presentation, be sure to give it a unique name. If you only save the Picture Presentation .pptx file, you won’t be able to modify your presentation in the future.
You can convert your PowerPoint presentation to an ordinary Windows Media Video (.wmv) file, and play it using the built-in Windows Media Player or any other video player. Your .wmv file can be enjoyed by any Windows or Mac user, even if they don’t have PowerPoint installed on their computer.
As always, don’t make your .wmv file the only version of your slideshow or you’ll be very disappointed when you want to make changes to the presentation.
PowerPoint lets you turn your slideshow into plain text. This is handy if you want to move some of the presentation’s text to your website or blog.
When you create a rich text format (.rtf) file, you save only the text. You lose all of the images, animations, slide-to-slide transitions, and other non-text objects.
It’s easy to save your presentation as a portable document format (.pdf) file. These .pdf files can be opened on any Windows, Mac, Unix/Linux, iOS, or Android device. The resulting file, however, is a static document. Don’t expect to see slides fade in and out. All of your animated objects will become static.
You can save your slides as an XML Paper Specification (.xps) file. That’s a fancy way to say that if you double-click your .xps file in Windows Explorer, the operating system will open your file using its built-in XPS Viewer.
The XPS format is ideal for sending your slideshow to users who have neither PowerPoint nor Adobe Acrobat Reader installed on their computers. As with the .pdf format above, .xps files have text and images, but no animation.
If you’re happy with this year’s Financial Results slideshow, and you want to create next year’s presentation using the same colors and fonts, then save your current presentation as a template, and use it over and over.
As you may have guessed, save your work as a .potx file for use in PowerPoint 2007 and newer, as a .potm file for a 2007 or newer macro-enabled presentation, and as a .pot file for use on PowerPoint 97 through 2003.
Because Microsoft PowerPoint is part of Microsoft Office, you can use two Office file types to make your PowerPoint work easier and safer.
You can save your presentation theme as an Office .thmx file. Future PowerPoint presentations, as well as Word documents and Excel spreadsheets, can use this Office theme to set their fonts and colors. This results in a consistent look and feel to all of the Office documents that you present to prospects and customers.
Autosave is built into most Office applications, including PowerPoint. If you experienced a power outage and hadn’t saved your PowerPoint presentation before you lost power, it’s possible that there’s a recent version of your slideshow in the Office Autosave library. If you click File, click Open, and click Recover Unsaved Presentation, you may be pleased by the information that PowerPoint saved for you.
There’s no need to memorize all of the PowerPoint file extensions and options that are available. But be sure that you’re including all of these files when you do your regular on-site and off-site backups. And bookmark this blog page so that you can return to it when you need to save or open a PowerPoint presentation in one of the less popular file formats.
ShapeChef is a tool that helps you find and manage graphics and charts for your presentations. Click here for details.